Google (and other search engines) focuses more and more on user experience. Pagespeed is a big part of that and it already has a big influence on your ranking. Therefore, optimizing the loading time of your website is essential. Both for the rankings and the customer journey.
A one-second delay in the loading time of your site can have the following consequences:
So, a few extra seconds can have a huge impact on your ability to engage visitors and generate potential sales.
PageSpeed is part of the Technical SEO pillar. Read about the other important elements of technical SEO here.
How do you ensure that your website has the most optimal pagespeed? I give you 10 tips to improve the speed of your website.
The main reason for having a fast website is your visitors. Research has shown that a large proportion of internet users nowadays bounce if a page takes longer than three seconds to fully load. You don’t want that, because your bounce rate will skyrocket and you want visitors to stay on your website for as long as possible. The bar is also getting higher and higher; approximately 50% of consumers expect a charging time of 2 seconds or less.
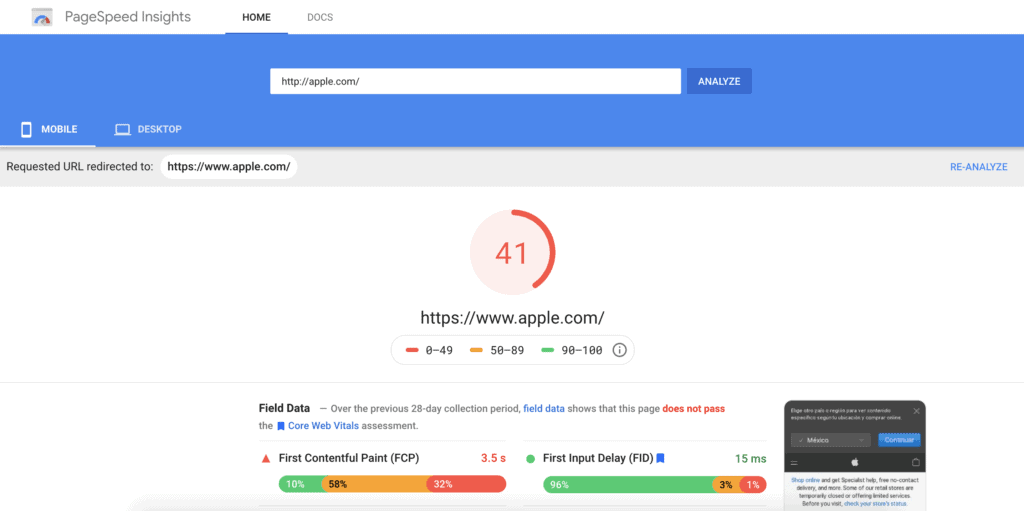
Loading time is also very important for SEO. Google does not like websites that are slow and will also “penalize” a website that is structurally slow with a lower ranking in the search results. As a tool, Google has introduced a PageSpeed tool that shows you what you can improve on your own website. Your website will receive a PageSpeed score with a maximum score of 100. Make sure that your PageSpeed score for Desktop computers does not drop below 50, as this can have a very negative effect on your ranking in Google.
You have performed a site speed test and found that your site loading time is quite slow.
There could be a number of reasons why your site load time is lagging. This can range from server load time to image size to the number of redirects you have.
You can do several things to achieve a faster loading time. I have listed the most important factors. Here are my 10 practical tips.
The hosting party you work with largely determines the speed of your website. When choosing web hosting, you should therefore pay attention to speed and the location of the servers. Hosting parties often have multiple subscription types, whereby the upgrade usually includes load balancing. This means that the power is automatically boosted when a lot of visitors come to your site.
When you host your website with a cheap hosting party, chances are that it is so cheap because you have hundreds of websites on one server. This is disadvantageous for the loading time because all websites use the same server. There are plenty of hosting companies that are affordable and deliver a lot better performance than the cheaper companies.
This website, my website, is hosted by Bluehost (affiliate link), a hosting party in the cheaper ranges of hosting providers.

But what most people don’t know is that Bluehost also offers Dedicated Hosting, where you will have your own servers and therefore a faster load time of your website.
* Dedicated Hosting is always more expensive than standard hosting. I highly recommend you do some research on this subject BEFORE you start building your website. Did you already chose a hosting provider, and do you want to change? No worries, Bluehost helps you for free to migrate your site to the preferred hosting service.
When you visit a website, the elements on the page are stored on your PC’s hard drive in cache or temporary storage. So if you later return to that website, the browser will load the page without sending a new HTTP request to the server.
The first time someone comes to a website, they have to download the HTML document, Javascript files, stylesheets and images. Sometimes these are dozens of different components. After the page has loaded and the various components are cached, only a few more components need to be downloaded on the next visit.
With WordPress it is not rocket science to give your website a speed boost in browser caching. You can use a plugin such as Autoptimize or W3 Total Cache to enable caching.
After installing the plug-in, go to “Page Cache” under “General Settings” and check the box to enable.
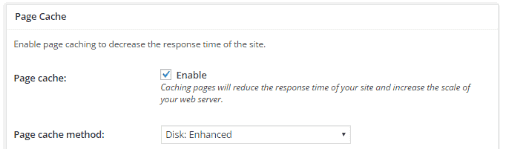
After configuring the caching settings, you should immediately see load time improvements. The makers of the W3 Total Cache plugin indicate that users see up to a tenfold increase in the Google PageSpeed results. Although W3 is a great plugin, my choice is Autoptimize; I have the best experience with this.
If it is a static HTML website without the WordPress CMS, you can manually enable caching in the .htaccess file. Lines of code can be added here, which tell browsers what to store in the cache and for what period.

This allows you to specify how long each file type should be stored in the browser’s (visitor’s) cache. Static sources must have a cache life of at least one week. Third-party resources, such as ads or widgets, must have a shorter cache life of at least one day. Sources such as JavaScript and CSS files or media files are cached for at least one week to one year.
This is something for the advanced. If you are not experienced in editing the .htaccess file, be careful with this and ask for technical SEO specialist guidance.
More than three-quarters of a website’s loading time is spent downloading the various elements of the page, such as images, style sheets, and scripts. An HTTP request is made for each of these elements. The more components, the longer it takes to display the page.
The first step in minimizing HTTP requests is to find out how many HTTP requests your website is currently making. If you use Google Chrome, you can find out by using the browser’s Developer Tools.
How:
Right-click on the page you want to analyze and click on “Inspect” then click on the “Network” tab. The “Name” column shows all the files on the page, the “Size” column shows the file sizes and the “Time” column shows how long it will take to load those files.
At the bottom left you can see the total number of requests the site is making. The aim is to minimize this number.
Now that we know how many HTTP requests the site is making, you can get started reducing that number. We start with the HTML, CSS, and JavaScript files; very important files, as they determine the look of your site. They also contribute to the number of requests your site makes each time a new visitor appears.
You can reduce this number (and improve your pagespeed) by shrinking and combining your files. Certain templates or plugins may entail codes that can slow down your site. Reducing the size of the files includes removing unnecessary formatting, white space, and code (s).
If your site has multiple CSS and JavaScript files, you can combine them into one. There are several ways to shrink and combine files, and if your site is running on WordPress, plugins like WP Rocket can come in handy.
If you use a lot of images on your website, this has a major influence on the loading time. Often images on websites are much larger than necessary when looking at the file format. In WordPress, you can easily reduce the images to the size you want to display them on the website. Compress the images to make small packages of the images and photos, as it were, without compromising the quality of the image. Here too you can use various practical plugins, including the popular plugin WP Smush.
Deferring JavaScript means that it is not loaded until other elements have been loaded. Delaying larger files, such as JavaScript, to load times will ensure that the rest of your content can be loaded without delay.
A WordPress work environment also makes life easier here. The aforementioned WP Rocket plugin can also be used to delay JavaScript files. WP Rocket, and other plugins, offer simple functionality, where you have to tick a checkbox: “Load JS files deferred”.
In addition to the amount of time it takes to fully load your page, you should also pay attention to the time it takes to start loading (anyway).
Time to first byte – TTFB – is the amount of time it takes for a browser to fetch the first byte (of data) from the server. Google’s TTFB recommendation is: less than 200 ms.
Unlike many of the front-end performance factors, this aspect rests with the server. When a user lands on your site, their browser sends an HTTP request to the server hosting the website. Then there are three steps in the process from the request to the first byte loaded:
If you use Developer Tools to measure the TTFB, keep in mind that the response time (step 3: “Response”) can be affected by your internet speed. To access this information: go to the “Network” tab and then the “Waterfall” column.
In general, a slow TTFB is caused by network problems, web server configuration, dynamic content, or, for example, website traffic. Dynamic content and server configuration are the two aspects that you can influence.
Unlike static pages, a server must “build” a dynamic file before responding.
With a WordPress site, the relevant pages are likely to be dynamic. This means they must interact with a database to be “built” with PHP before being delivered.
You can reduce the time this takes by enabling caching.
In addition to optimizing the files, it can also be determined in which way they are ultimately loaded. Scripts such as CSS and JavaScript can be loaded in two different ways: synchronous or asynchronous.
When the scripts load synchronously, they do this one at a time, in the order they appear on the page. With asynchronous loading, some scripts are loaded at the same time. This method can improve the pagespeed of your website.
Synchronous charging is done as follows. A browser loads a website “from top to bottom”. When Chrome, or any other browser, sees a non-asynchronous CSS or JavaScript file, it will stop loading until it loads that particular file completely. If that same file were asynchronous, the browser could load other elements of the page at the same time.
If we want to tackle this using a plugin, look for the function “Render-blocking CSS / JS” and activate it. The plugin WPRocket offers the solution here too.
The smaller the files, the faster the pages of your website will load. Compressing files is a simple way to reduce loading time. Compression with Gzip is often seen as standard.
Gzip is a software that tracks strings of similar code in your text files and then (temporarily) replaces them to make the files smaller. This method works well with HTML and CSS.
Most servers can compress files in Gzip format before sending them for download. Studies show that this can reduce download time by about 70%.
If you are unsure whether Gzip is enabled on your site, you can use an online Gzip test to check. Enter the URL of your site and if you have Gzip enabled, you will see a confirmation:
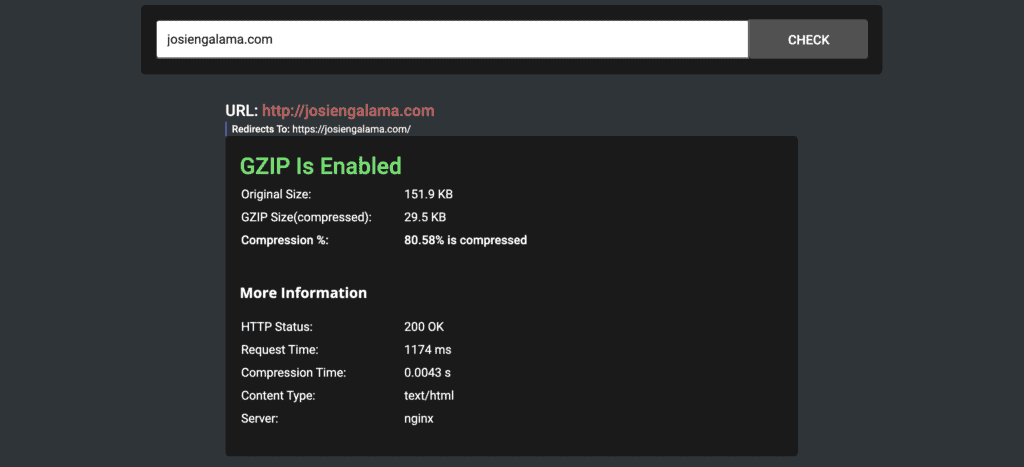
If Gzip is not enabled, I recommend that you fix this as soon as possible. With a WordPress website, you can solve this with a plugin. A number of plugins (think of WPRocket, Autoptimize or W3 Total Cache) support enabling Gzip. In W3 Total Cache, all you have to do is check the Enable Gzip box.
With the PageSpeed test from Google, you can critically examine the loading time of your website. In addition, you want to be sure of fast internet if you want to test the results of your adjustments on the loading speed of your website yourself. Your router does not always provide the best internet signal and you may be in a place with little range. In this case, use a powerful WiFi antenna to ensure that your tests are not affected by the speed of the internet.